
Making roman shades is relatively easy. Finding the “findings” for the shades — cord locks, rings, cord, and more — can be difficult if you’re shopping at a bricks and mortar store.
While I always do my best to support stores with a real retail presence (as opposed to virtual), sometimes I have to do my shopping online. But because the wording used to describe cording varies widely from site to site, it took a while before I knew what was what. Here are a few tidbits I’ve picked up along the way.
Depending or where you shop, you will see cord for roman shades listed by a number of names: lift cord, pull cord, shade cord, roman shade cording, and even string! All these items – regardless of their name – come in a variety of dimensions which are expressed in many different ways: you’ll see them listed in fractions of an inch, a decimal value expressed in millimeters, a generic size name, or a manufacturer’s number. For example:
- A #32 cord (shown on the right in the above photo) is the same as 1/16″, 1.4mm, size 50, and manufacturer’s number E331.
- A #38 cord (shown on the left) is the same as 5/64″, 2.0mm, size 205, and manufacturer’s #332. Sheesh!
So how do you know which size to use for your roman shade project? It depends on the weight of the shade, which is influenced by the weight of your fabric and the dimensions of the shade. For example, the six shades in my sun porch are all 48″ tall and vary in width from 21″ to 44″ to 53″. The fabric is a lightweight woven polyester damask. Even the largest shade isn’t all that heavy after the weight rod has been inserted in the bottom pocket, so for my project the 1.4mm ( #32) cord works just fine. (Also acceptable would be 1.5mm and 1.6mm).
However, if I was using a tapestry-weight fabric for a window over six feet tall and 3 feet wide, the heavier 2.0mm cord (#38) would be the way to go. And if I was making a balloon shade out of a gossamer voile or other semi-sheer, I would go the other direction and opt for 0.9mm.

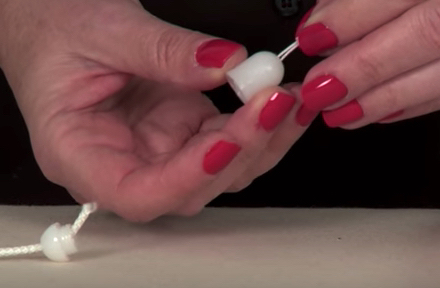
One other thing to consider is whether or not you plan to use an item called a “cord condenser.” A roman shade for a typical window will have anywhere from three to five lift cords. To keep them from getting tangled at the side when you’re raising or lowering the shade, you can either knot the bunch together, braid them, or use a condenser. This two-part plastic cap lets you feed the cords through a small hole, knot them, and trim away the excess. The other part of the condenser has a single pull cord. When you screw the two parts together, the multiple cords are concealed and all you have to deal with when raising and lowering the shades is a single cord.
Why does this matter? Because cord condensers can only accommodate a certain number of cords. Up to 3 cords will fit if they are 1.8mm. But if you use size 1.4mm, the condenser will accommodate up to 7 cords. So let’s say you’re making a roman shade for a 55″ wide window. You will need anywhere from five to six lift cords depending on the weight of the fabric. (I always opt for more cords; they’re not expensive, and the extra time it takes to sew an additional column of rings provides a lot of support and more control of the folds.) Although you might prefer the heavier weight cord, you’ll have to stick with 1.4mm if you hope for it to pack nicely inside the condenser.
Whew, so much to know about such a small part of the whole! Stay tuned for more roman shade chit chat in the weeks ahead. And if you have any questions about cords or other aspects of DIY roman shades, drop me a line or comment below. Happy stitching!